My Journey Of Building Graphics Rendering Engine Using Vulkan SDK | Week 2
Vulkan requires lot of boilerplate code even if you wish to draw simple triangle or display cube. There are almost 16 different modules that you need to complete before you have something on the screen. Last week we barely had a window created and we were aiming towards displaying triangle this week.
Howdy Everyone! If you’re regular visitor and here to see my progress on this project, I am glad to see you here. If you’re new visitor, You might like to start from my last blogpost when I started working on this project from scratch. Thanks for visiting.
Allright, so last week we had simple window created on screen with barely any Vulkan code. During last 1:1 meeting with my professor Dr. Varcholik, his feedback was he wanted to see more that a triangle on the screen i.e, focus on displaying rotating cube. Another feedback I received was about starting using GrindStone software to log my estimates, so yeah, I’ve started logging my activity from this week.
So about this week’s task which is displaying cube, which I was originally planned to do in 4th week of the development but now as its moved forward, let’s list down different modules required in boilerplate code for Vulkan renderer. I would suggest you to read great article by Alain Galvan on Medium about raw Vulkan. Here’re some of those tasks.
- Create a Vulkan Instance.
- Create Validation Layer with Debug Callbacks
- Select Physical device, Create logical device along with Queue Families.
- Create Window with Surface supported by glfw extension.
- Create Swapchain from logical device.
- Create depth attachment which will go into render pass.
- Create frame buffers for swap chain.
- Create Command Pool.
- Create Primary Render Pass
- Create Synchronization primitives.
- Create Vertex and Index buffers for Geometry
- Copy Vertex, Index, Uniform buffer data to GPU Local Memory.
- Create Graphics Pipeline to represent entire state.
- Create commands for each command buffer to render cube.
So it was big task. It all boils down to whether you want to use boilerplate code provided by Vulkan SDK or write your own. If I were to foray deep into specific technique and I had some prior knowledge of Vulkan, then I could have resorted to using some boilerplate code to focus on developing specific technique rather than focusing on basics.
But my goal is to learn all the basics of rendering engine so I’m going to write my own boilerplate code. So during this week, I had planned to complete as many as tasks as I could but due to some other commitments like Capstone and stuck in bugs for more than a day I underdelivered for this week. ( Which isn’t good so I hope to keep better track of time from upcoming week ).
btw, Feel free to visit my GitHub repository to checkout my project and download code files.
Link to This Project’s GitHub Repository
You can go to “releases” section on my GitHub repo and download zip file under tag “Week_II_Progress“. So You can look into the code which I’m referencing here.
Lets dive into what I’ve done this week. So I have worked on first 5 tasks from this list I mentioned above. Creating Validation Layers with debug callback took me too much time than I thought. It’s about doing validation check and displaying verbose messages. It depends upon whether we are using Extensions or not.
One of the important thing to note is, if you wish to use any extension functions ( Generally marked by ‘EXT’ ), you can’t use default Static loaders. You must need to create Dynamic Dispatch Loader and pass it as an appropriate parameter to function calls. First we’ve created 2 vectors, one for Validation Layers and other for Extension Names and Layer Properties. Then we’ve set Validation Layer to our desired value “VK_LAYER_KHRONOS_validation” and as we are using glfw for window creation, first we get the extensions required by glfw and then we add another extension that we would like to have i.e, “VK_EXT_debug_report“.
Then we have initialized layer properties vector with list of implicitly enabled layers, Compare each property with properties related to Validation Layer which we’ve set before. Extension names vector now contains all implicitly and explicitly defined extensions which we will update to InstanceCreateInfo struct we’ve created last week.
With that, we can create Vulkan Instance, but there is a problem, as Vulkan isn’t aware about extensions we have applied, we need to create Dynamic dispatch loader from our instance and pass it while creating DebugReportCallback. Last line of the function CreateDebugCallbacksForValidationLayers() creates a callback using 4 different parameters where first one is implicit ( calling Vulkan instance takes first param place whereas last param is Dynamic Dispatch loader we created before. Our DebugFunction() switches based on flags and outputs generated message.
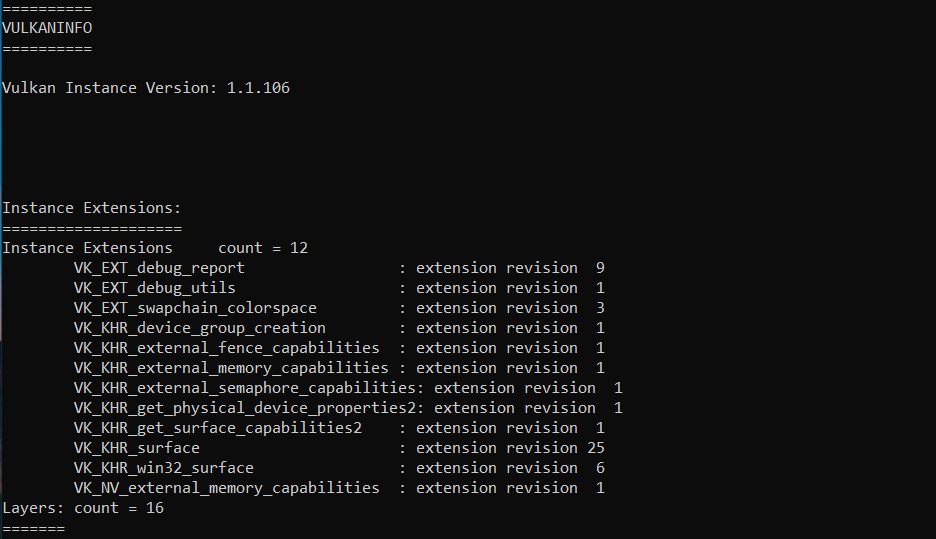
Now you might wonder that how one can know about what are the different layers and extensions supported on given GPU ? Its very simple actually. Vulkan SDK comes with command line utility called VkInfo() which will list all supported layers and extensions. When you run that utility, it should look like this.
Selecting Physical Device and Creating Logical Device is very straightforward. We have implemented methods with the same name.For selecting physical device, we enumerate on all physical devices and select first one. As we are creating unique device, we don’t have to explicitly destroy it but there is expense, we need to specify custom allocator if any and Dynamic dispatch loader while creating logical device. While creating device, first we search for any queue from our QueueFamilyProperties supporting Graphics bits.
Then the last part is Creating Window Surface. As we are using glfw for window creation, we are calling glfwCreateWindowSurface() with Vulkan instance and glfw Window instance we created before. Then we iterate over QueueFamilyProperties to check whether it supports presenting or not. In the end, even though we’ve separated logic for assigning index for GraphicsQueueFamily and PresentQueueFamily, in our case, both index should be same.
So, writing boilerplate code modules has been great learning experience so far. I have never used Debug Callbacks / Dynamic Dispatch Loader before and so, solving linker error was bit pain but it’s all part of learning process.
Next Week Task:-
So, for next week, I would like to complete entire boilerplate completed to have 3D model on screen. I might delay texture and depth support as goal is to have something on screen other than window.
I hope that you’ve found this dev diary informative and useful. Feel free to comment down below on what do you think and also if you have any questions or requests, You’re most welcome! Stay Tuned!
Thanks for visiting. Have a great day ahead.. 🙂